Tutorial: Making or changing your drawing header
Goal
Making or changing your drawing header.
Steps
You can also download an example drawing header.
Printing Header Options
When finishing a schematic diagram in Hydrosym it is almost always necessary to print the schematic including a header that includes all the specifics of the diagram. This header also includes other data that need to be mentioned in the drawing (think of current date & time for example).
Making a Header
A header can be made by the designer. In Hydrosym, open a new schematic diagram file. Lines can be drawn by clicking the “L” button on your keyboard. You can now draw the line and therefore draw a header in the desired size. It is recommended to choose a width of 1800 (X-coordinate in Hydrosym, seen in the bottom of the screen) for your header. For example the next drawing has been made:

As you can see the header has been drawn as well as the content. The green is text and the orange are attributes. Both can be filled in with any text or number and in any size. To add attributes or text to your header do the following:
-
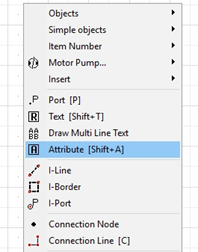
Right-click anywhere in your current schematic diagram. The following window will appear:
-
Choose Attribute (or use the shortcut key Shift+A). Text can also be selected in this window. When the attribute has been selected the next window will appear where you can adjust the settings of the attribute. For example the content has been filled in with “Name”.
To change the size of an attribute close this window. Right-click on an attribute. With “Scale” you can adjust the size. If it is desired to again change the content of the attribute, right-click on the attribute and choose “Properties”. The same window as above will appear where you can change the content. It is necessary to mention the header that has been made needs to be directed to the map “Borders”. Later in this manual will be made clear why this is important. When making a header it is necessary to know there is a function in Hydrosym that can easily change the attributes you have put in your header. Later in this manual this will be made clear. Therefore it is necessary to know you must not only use attributes. An example has been made to make this clear:
Here we can see an example of a part of a header. We see a text and an attribute. It is important to make the changeable value an attribute.
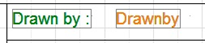
As mentioned, later in this manual an option will be explained that uses the attributes in a header to easily change the data. The text will always stay the same. In this example the green “Drawn by” will always be the same. The orange “Drawn by” needs to be changed. Therefore this has to be an attribute for Hydrosym to later make use of the option. Another way to make a header is to adjust an existing one. This is recommended because it takes much less time. Paro has several headers to choose from. The best way is to open an existing header, save it as a new header and then adjusting it to your wishes.
Adding An Image To Your Header
It can be necessary to change the manufacturers logo in the header. Hydrosym has a simple solution to insert any image in your header.
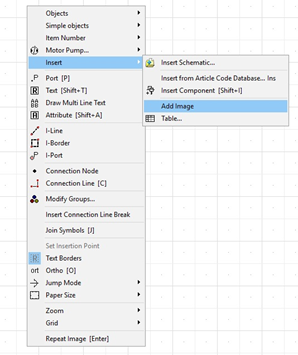
- When a header is open the following option can be selected. Right-click anywhere in the diagram, under “Insert” select the option “Add Image”:
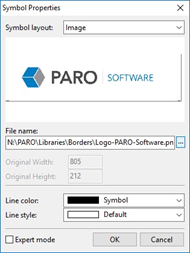
You can now select an image to import into the schematic. When you have selected an image, a square will appear in your drawing. Use this square to size your image. The drawing should look like this:

To change the image, select and right-click the image and select properties. Under “File name” you can easily replace the image by selecting a new file.
The imported image can be used to add to your header. For example in the header below, the Paro logo has been added.

Selecting A Header
Now that the desired header has been made it is necessary to know how to select the header. This has to be done so that Hydrosym will direct your header to the printing file. The first way to select the header you want to your schematic is the following. When the option “Print” is opened (left-top window, printing icon) the Print window will appear. To the right of the screen an option can be chosen: “Select Header…” Choose this option. The following window will appear.
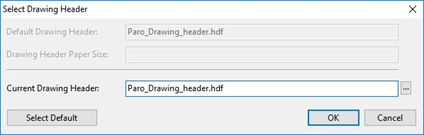
At “Current Drawing Header” you can change the header directed to your file.
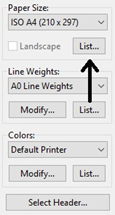
Another way to select a different header for your schematic is the following. When the print option is selected, in the right-top corner the next option can be chosen. Click the option “List…” under Paper Size as you can see in this image:
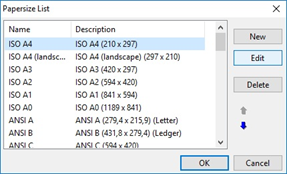
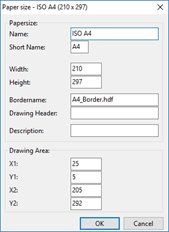
The following window will appear. Here you can edit the paper size. To choose a header select the option “Edit”. Next you can give the name of the desired header in the box “Drawing Header”. An example of this window is given below:
Hydrosym will search for the border in the map “Borders”. This is why it is necessary to store the file in this directory. The third option is the following. Select the tab “Tools” and choose preferences. Under “Misc” you can see the “Default Drawing Header” option. When network settings is selected this header can not be selected. To unselect these network settings, go to the “Network” tab in the same window and unselect the option. Now again under “Misc” you can select your header.
Adjusting the Data
There is an option in Hydrosym to simply adjust the data of your header. Earlier in this manual it has been made clear how to use the attributes in a header when making one. Hydrosym will only search for the given header (for example Paro_Drawing_Header.hdf like in the image above) as well as the logo in the directory: “Borders”. When a header and/or logo is selected, the file of this header needs to be directed to this file. If the header is filed in this directory, it will also make it possible to change the attributes according to the next options:
When a schematic is drawn the option Print can be chosen. The window for printing will appear, as well as the header.
-
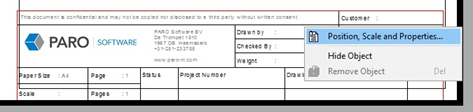
Click on the header in the right bottom of the printing page. The outer lines of the header will become red. Now right-click on the header and select “Properties”:
The following window will appear, here we can change the data of the attributes:
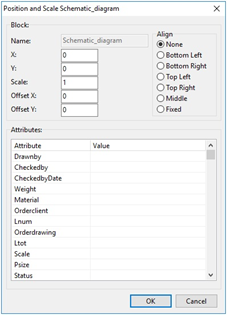
-
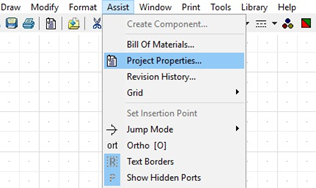
The second option is the following. Select the tab “Assist”” in Hydrosym. Then select the option “Project Properties…”.
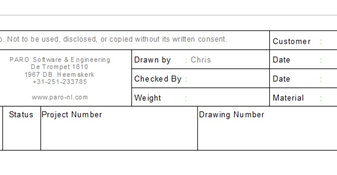
You can now adjust all the data needed for the header. When changed click on “Ok”. For example the attribute “Drawn by” has been changed to “Chris”. We can now go to the printing option. You can see the header in the printing page. The attribute “Drawn by” has been filled in. This is why it is important to use attributes.
In this way all the data mentioned before can be changed accordingly to the data needed. Various attributes can be filled in but others have a standard value. For instance the page nr. is standard and will be filled in by Hydrosym itself. All the attributes and their function are listed in the back of this manual.
List of Attributes
The following is a list of attributes to make clear which are being automatically filled in by Hydrosym. There are also some attributes that you may not insert into your header, and some attributes can only be used when they are the only option to choose from. These attributes are being used for other purposes.
Automatically filled in by Hydrosym
| CURRENTDATE, CDATE | Current date |
| CURRENTTIME, CTIME | Current time |
| LAYOUTNUMBER, LNUM | Layout/page number |
| LAYOUTTOTAL, LTOT | Total number of layout/pages |
| PAPERSIZE, PSIZE | Paper size |
| FILENAME | File name |
| FNAME | File name without extension |
| FILEPATH | File name with full path |
| REVISIONNUMBER, REVNO | Last revision number (empty if the revision history is empty) |
Not to be used for the header (these attributes have special functions in diagrams)
| ORIFICE VALUE | |
| ORIFICE NAME | |
| SOLENOID NAME | |
| SOLENOID NUMBER | |
| LOGO | |
| SIZE | |
| CONNECTION LINE SIZE | |
| CONNECTION LINE FLOW | |
| CONNECTION LINE VELOCITY | |
| CONNECTION LINE SINGLE ARROW | |
| CONNECTION LINE DOUBLE ARROW | |
| CONNECTION LINE BOTH ARROWS | |
| CONNECTION LINE BREAK TEXT |
Preferably not to be used for the header (use the revision history instead)
| REV1NO | |
| REV1DATE | |
| REV1DESCRIPTION | |
| REV1CHECKEDBY | |
| REV1DRAWNBY | |
| REV2NO | |
| REV2DATE | |
| REV2DESCRIPTION | |
| REV2CHECKEDBY | |
| REV2DRAWNBY | |
| REV3NO | |
| REV3DATE | |
| REV3DESCRIPTION | |
| REV3CHECKEDBY | |
| REV3DRAWNBY | |
| REV4NO | |
| REV4DATE | |
| REV4DESCRIPTION | |
| REV4CHECKEDBY | |
| REV4DRAWNBY | |
| REV5NO | |
| REV5DATE | |
| REV5DESCRIPTION | |
| REV5CHECKEDBY | |
| REV5DRAWNBY |